Assignment #19
FINAL PORTFOLIO
You are near the end of the semester! You've created a lot of great work during this time. Let's show it off!
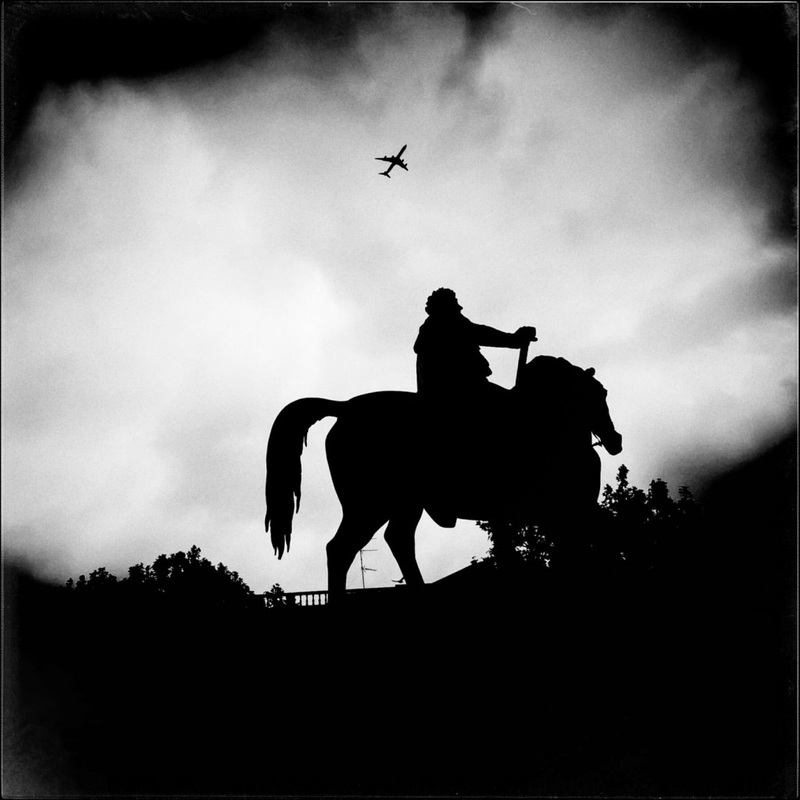
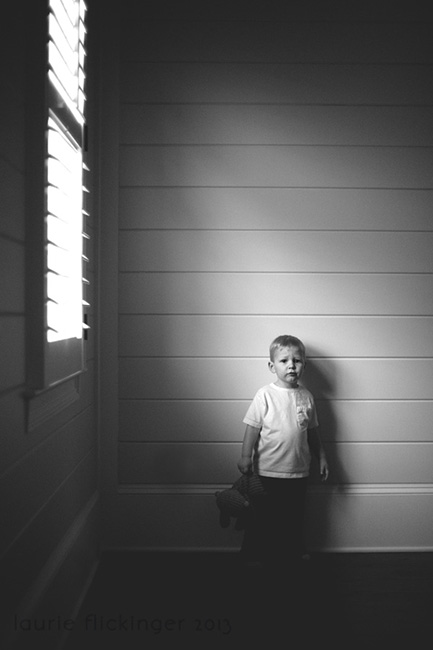
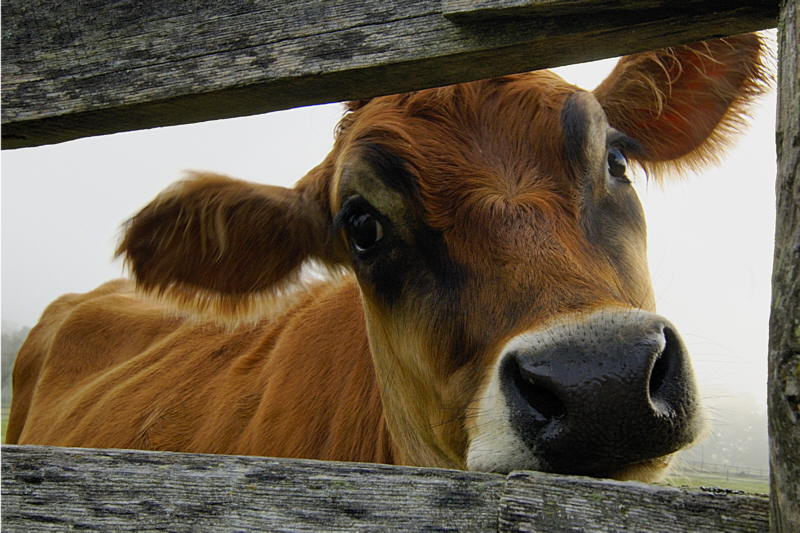
For this project you will create a portfolio in Lightroom using your very best work (limit 9 photos)
1. look through your work from this semester. Remember to only use YOUR OWN WORK (we've had a few assignments where we used other's work. If you've edited enough, you can claim it as your own).
2. Edit photos!
3. Create a folder on your desktop titled " (your name) FINAL PORTFOLIO"
4. Get portfolio checked by TWO PEERS
ask:
5. After two peer reviews, get selection checked off by Mrs. White
DAY TWO
BRIEF LIGHTROOM DEMO
CREATING AN HTML PORTFOLIO USING LIGHTROOM:
1. Open lightroom
file > import > photos & videos
find portfolio folder
select the images > import
2. Make any adjustments to images in lightroom
3. click "WEB" (top right of lightroom)
follow instructions in class to create an html website portfolio
make adjustments to suit your personal taste
4. save as "NAME, online portfolio" on your desktop
Open and view. See if any adjustments need to be made (if so, edit and save again)
Once it looks just how you want, drag and drop the ENTIRE FILE to the drive
***Extra credit: upload portfolio images to your website under "portfolio" *must inform me so I can check it off!
For this project you will create a portfolio in Lightroom using your very best work (limit 9 photos)
1. look through your work from this semester. Remember to only use YOUR OWN WORK (we've had a few assignments where we used other's work. If you've edited enough, you can claim it as your own).
- framing
- postcards
- touch ups (only own photos)
- album artwork
- inspo photos
- Kaleidoscope
- Barbara Kruger
- What's the code (glitch)
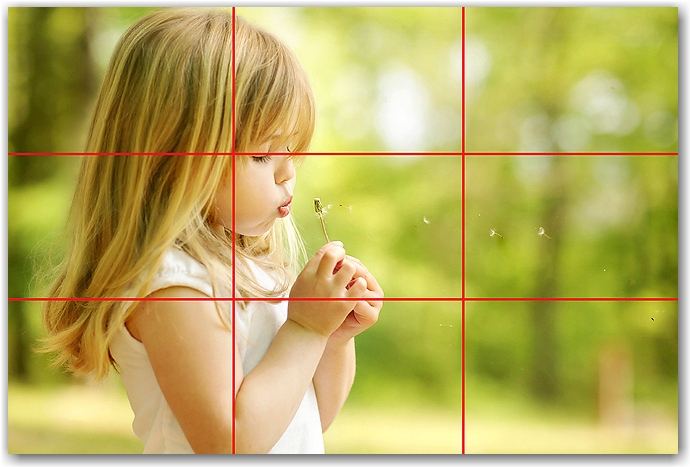
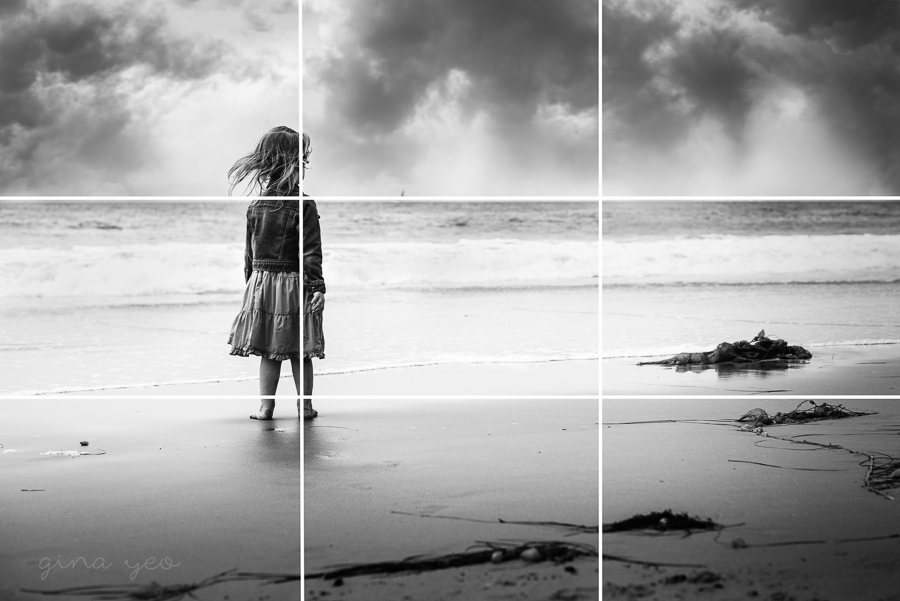
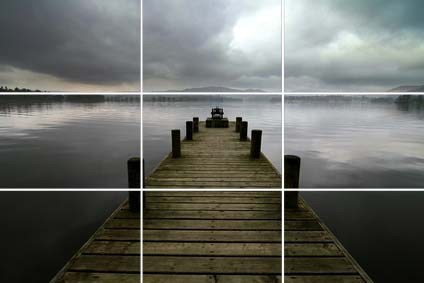
- rule of Thirds
- people, places, things
- any work inside or outside of class that you'd like to feature.
2. Edit photos!
- enhance
- adjustments
- contrast
- cropping
- sharpening
3. Create a folder on your desktop titled " (your name) FINAL PORTFOLIO"
4. Get portfolio checked by TWO PEERS
ask:
- what photo is my greatest strength?
- what photo is my weakest link?
- Are there any photos that have distractions in them?
- What photo could I edit to further improve?
5. After two peer reviews, get selection checked off by Mrs. White
DAY TWO
BRIEF LIGHTROOM DEMO
CREATING AN HTML PORTFOLIO USING LIGHTROOM:
1. Open lightroom
file > import > photos & videos
find portfolio folder
select the images > import
2. Make any adjustments to images in lightroom
3. click "WEB" (top right of lightroom)
follow instructions in class to create an html website portfolio
make adjustments to suit your personal taste
4. save as "NAME, online portfolio" on your desktop
Open and view. See if any adjustments need to be made (if so, edit and save again)
Once it looks just how you want, drag and drop the ENTIRE FILE to the drive
***Extra credit: upload portfolio images to your website under "portfolio" *must inform me so I can check it off!
Assignment #18
PS PLAY Editing Blemishes
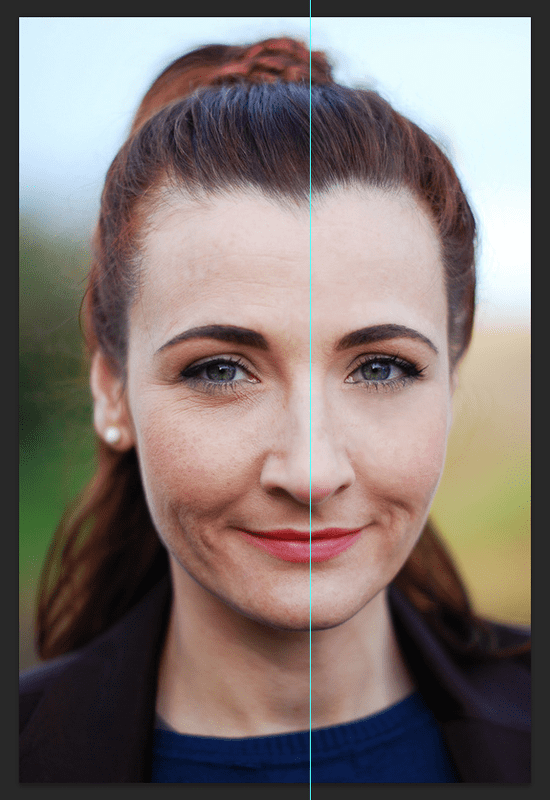
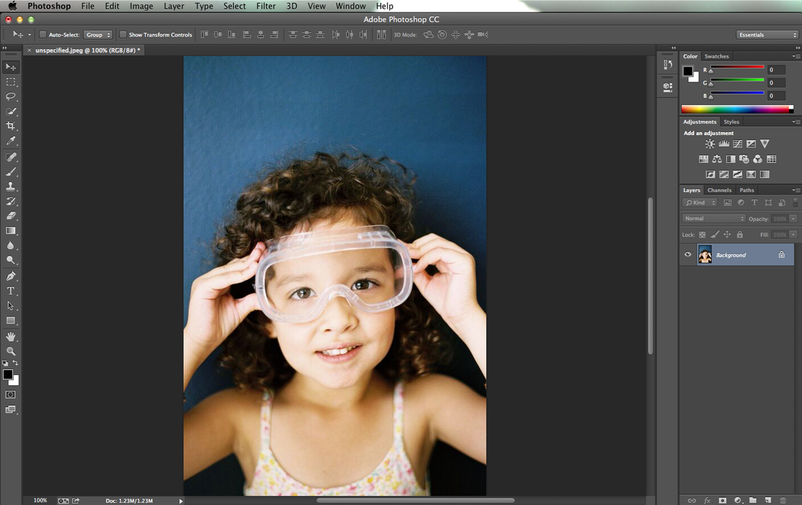
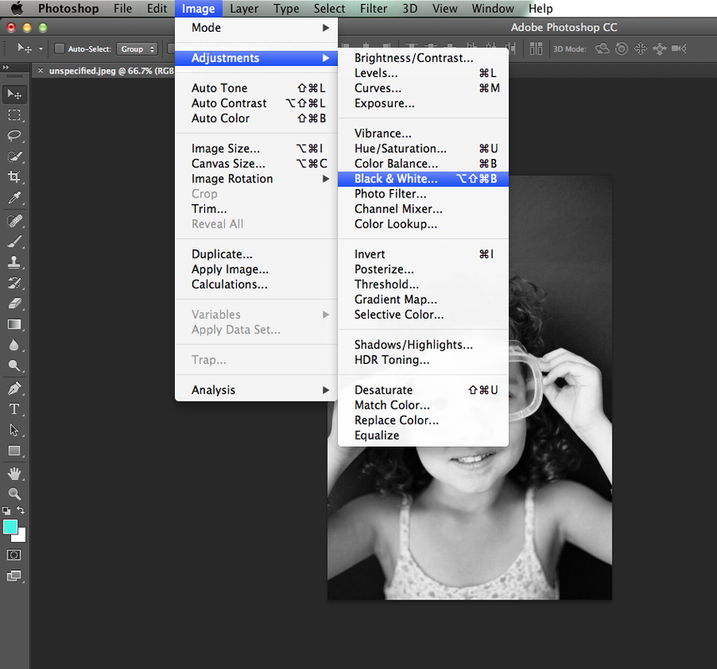
Every once in a while you'll take a photo that you'll want to do a little more photoshopping on. Maybe the skin has blemishes that need fixing, or wrinkles to erase. Whatever the case, photoshop can be an amazing tool to solve these skin issues. However, be careful you don't overdo it. It's very easy to see when a photo has been overly "shopped". The idea is to keep the editing realistic. We want to make eveeryone look like their best self!
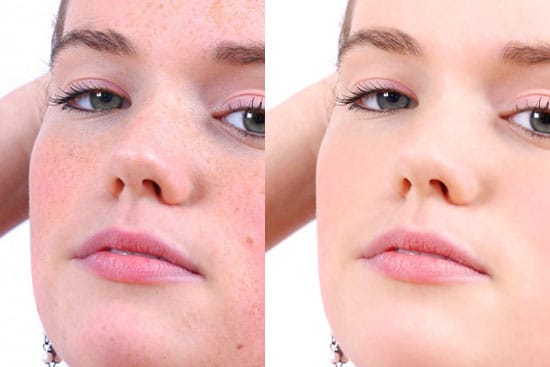
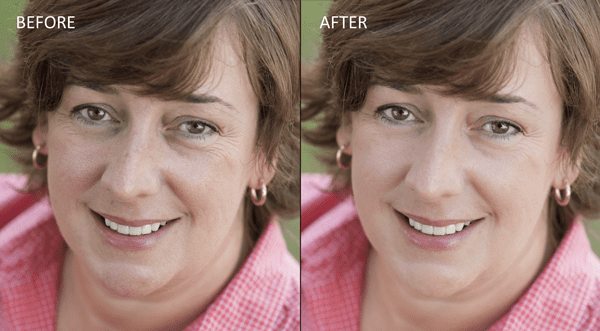
There are several ways to minimize blemishes on the face using photoshop:
SURFACE BLUR
Quick Selection: drag over skin
Alt/Option to get rid of selection areas
Select: refine edge check "smart radius" Increase radius a little bit
brush over areas with hair
output as new layer with layer mask
click box next to original in layers
filter>blur>surface blur
radius 16 threshold 12
HEALING BRUSH TOOL
Assignment #17
STUDY GUIDE slideshow
In groups of 2-3 you will be assigned a standard. You must create a google slides powerpoint containing at least 10 slides covering your assigned topic:
Standard 1: History of Photography
Standard 2: "workflow"
Standard 3: Types of Digital Cameras
Standard 4: Camera Modes
Standard 5: Memory Devices
Standard 6: Operating point & shoot, and DSLR
Standard 7: Proficiency in Photoshop
Standard 8: Elements of Composition
Standard 9: Copyright Laws (SKIP. We will go over in class together)
Standard 10: Careers
Your final slide should include 5 potential questions that could be on the test. It will act as a mini quiz when you present to the class.
You will have a full class period to work on this. Make sure you include dates & names when applicable. Use photos to show examples. and think of creative ways that can help us with memorization.
Your team will present the slide the following class period. Each member of the team must contribute!
Refer to the Utah State Standards and study guides HERE to help inform your slides.
Assignment #16
PRINT VS. DIGITAL
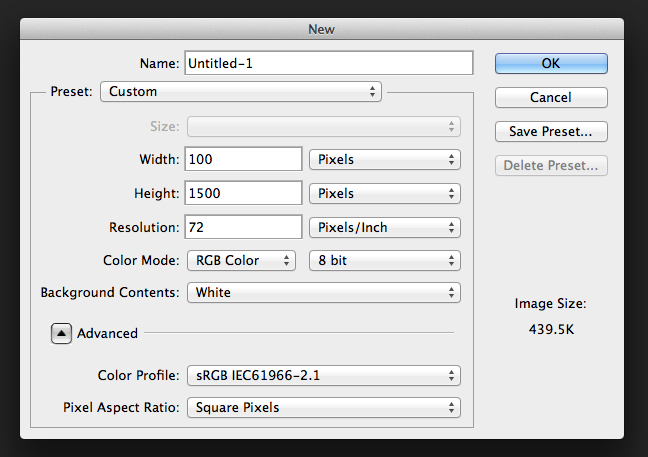
|
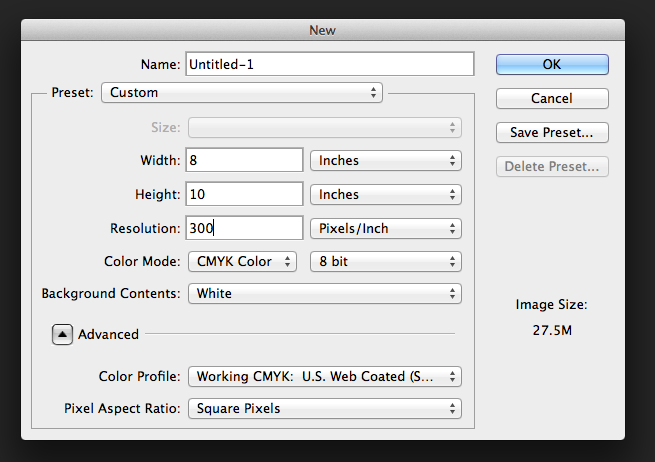
|
The two images above are of new photoshop files and look almost identical. However, there are 2 HUGE differences! One is for PRINT while the other is for SCREEN.
PART 1
In your own blog post on your website, drag these 2 images in and LABEL which is for print and which is for digital.
Then list the THREE differences between them.
PART 2
Find an example image online of 72 dpi vs. 300 dpi and add it to the blog post.
When you blog post is done, raise your hand and get it checked off by Mrs. White
PART 1
In your own blog post on your website, drag these 2 images in and LABEL which is for print and which is for digital.
Then list the THREE differences between them.
- Width & height style
- resolution
- color mode
PART 2
Find an example image online of 72 dpi vs. 300 dpi and add it to the blog post.
When you blog post is done, raise your hand and get it checked off by Mrs. White
POSTCARD DESIGN (sub)
Design a winter Holiday themed postcard/Christmas card!
Must include the following
Must include the following
- SIZE 4.25X5.5 inches
- 300 dpi
- cmyk color mode
- graphics (remember to search for png files!)
- background
- edits of your own
- text


Assignment #15
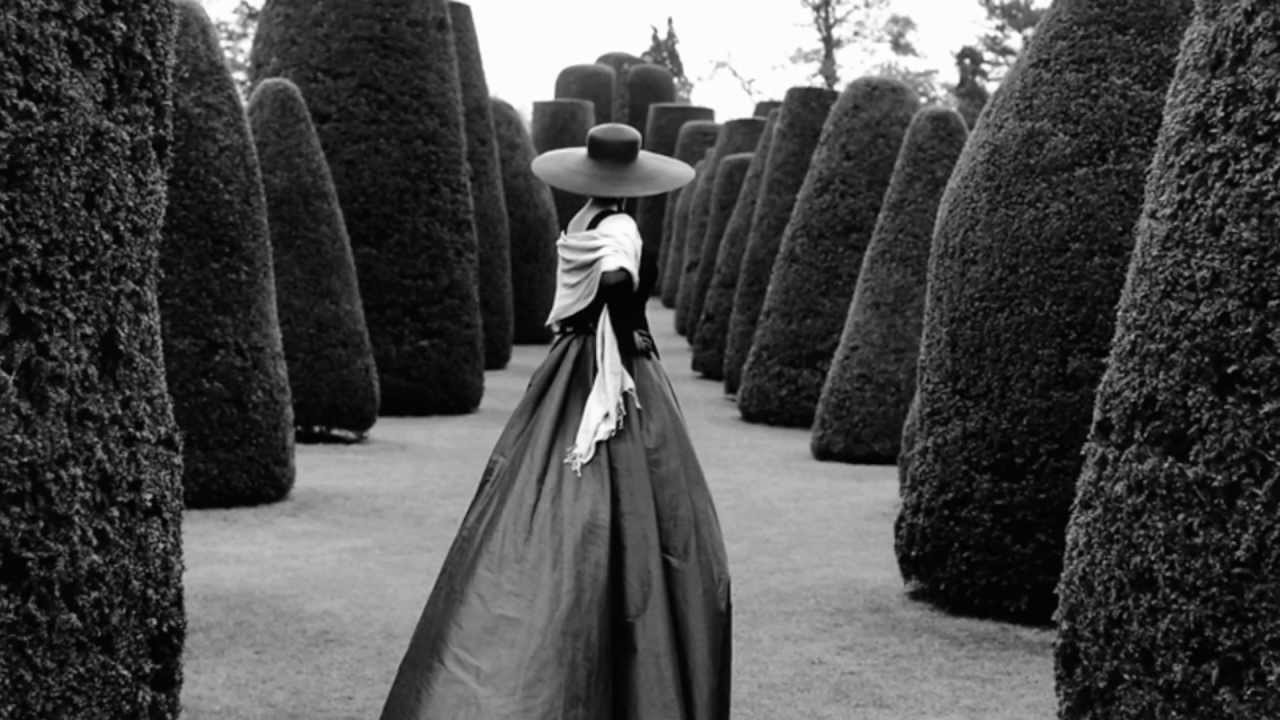
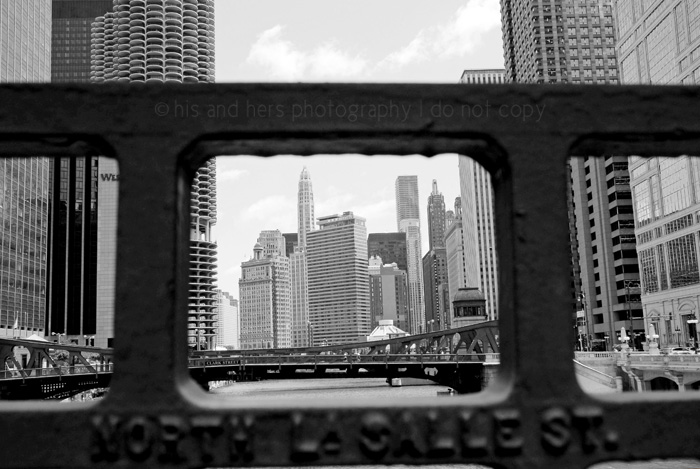
FRAMING
Framing in photography is a compositional tool to show emphasis and highlight subject matter. There are several different ways to utilize framing. Let's explore a few:
Structure
Environmental
Shape
Light
Line
Structure
Environmental
Shape
Light
Line
STRUCTURE
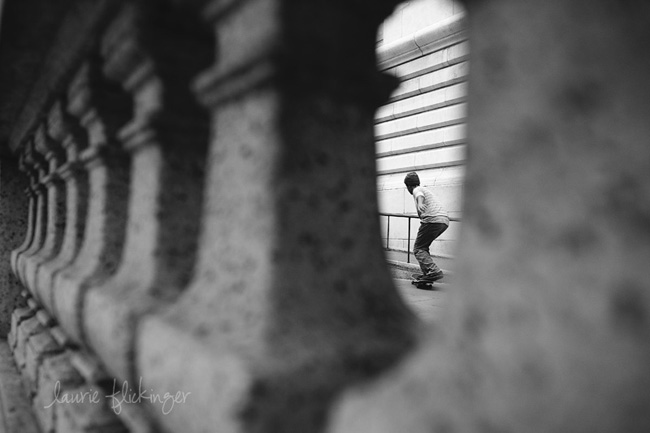
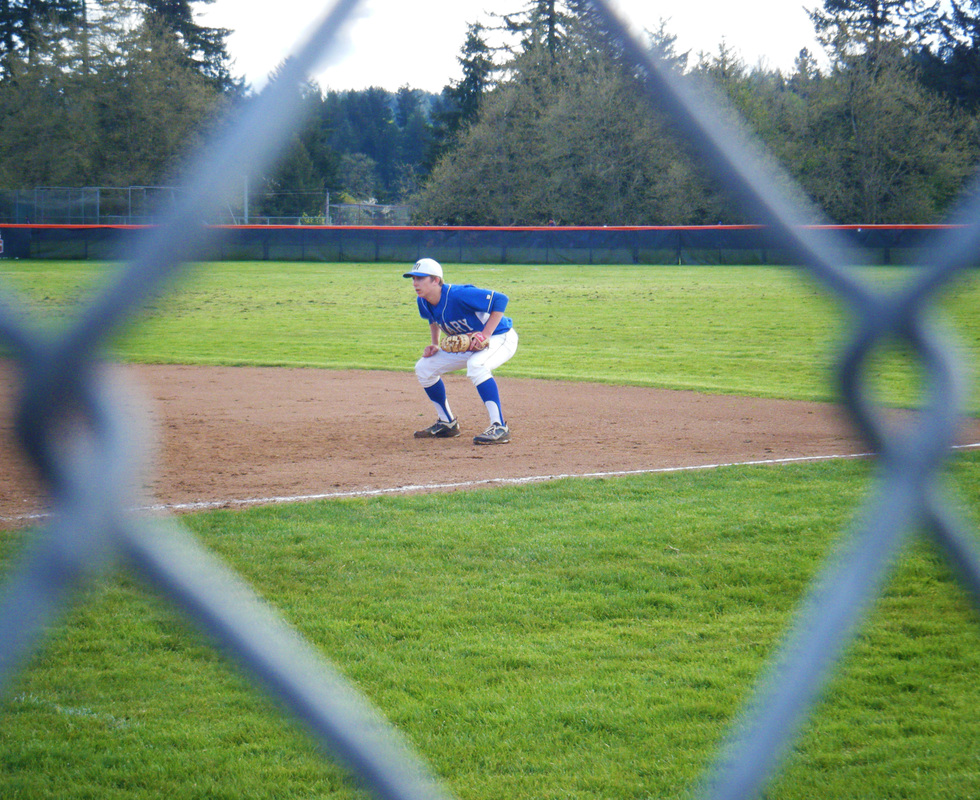
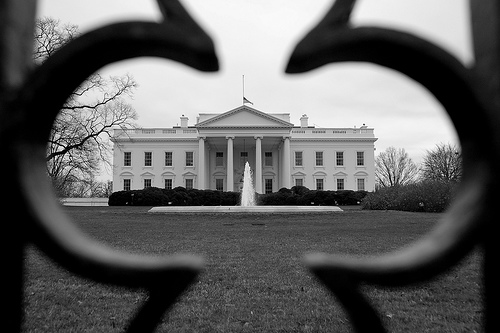
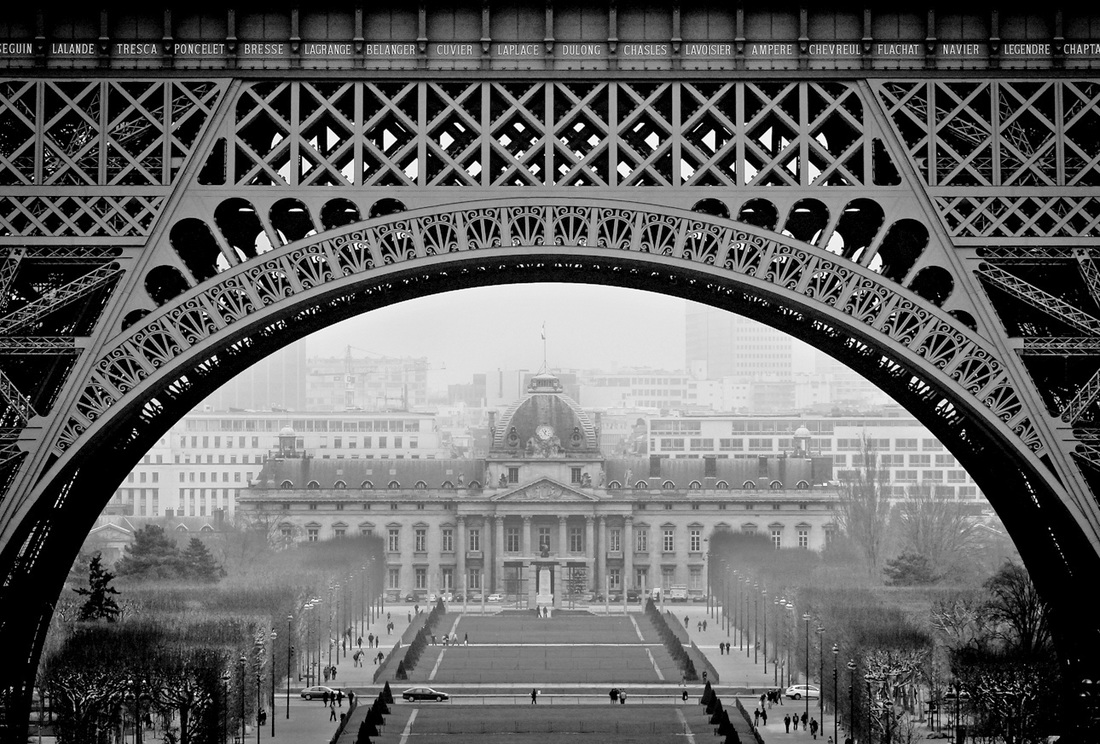

SHAPE
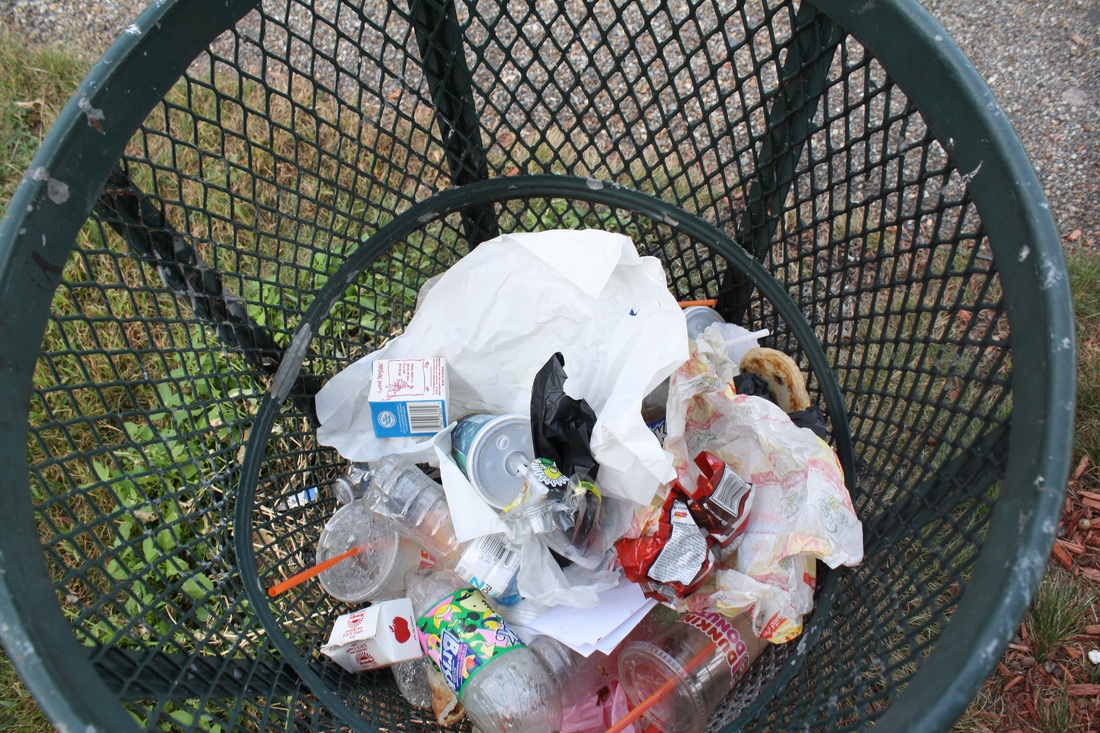


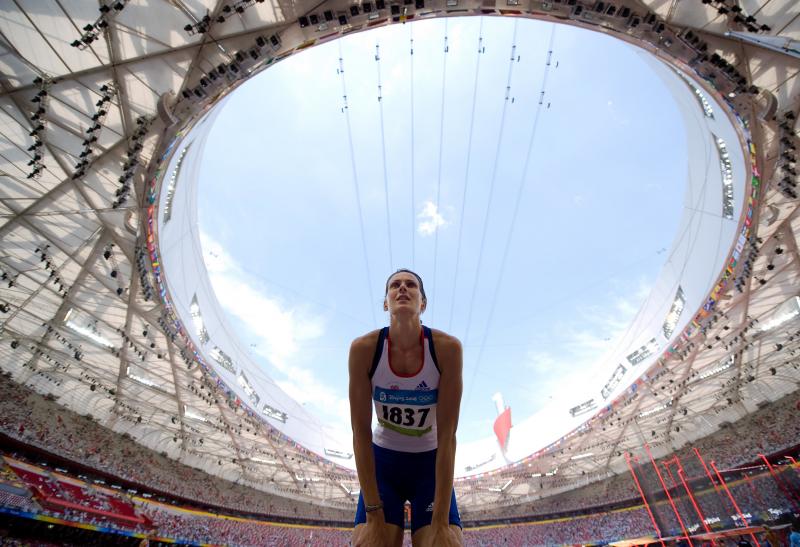
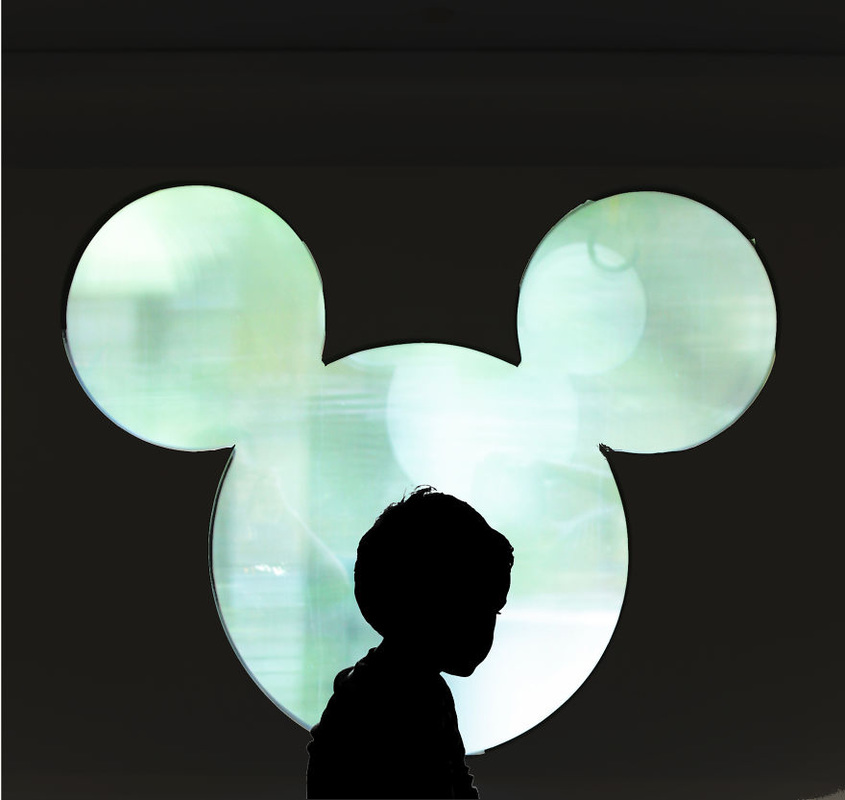
ENVIRONMENTAL
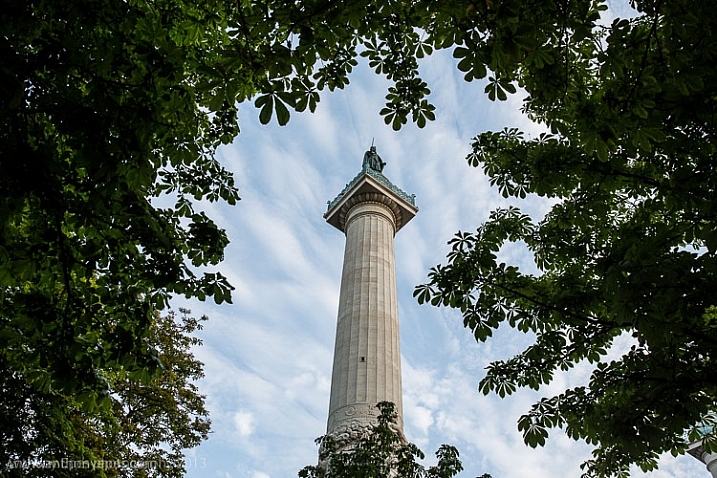

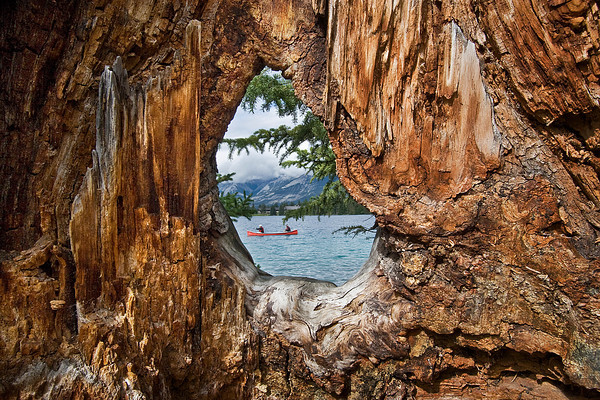
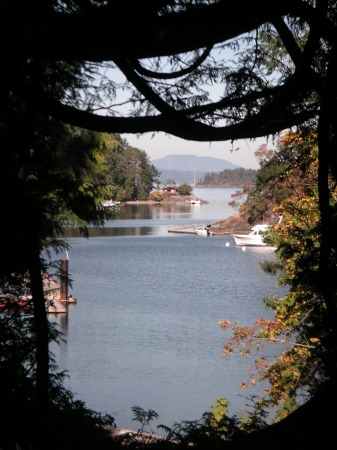


LIGHT
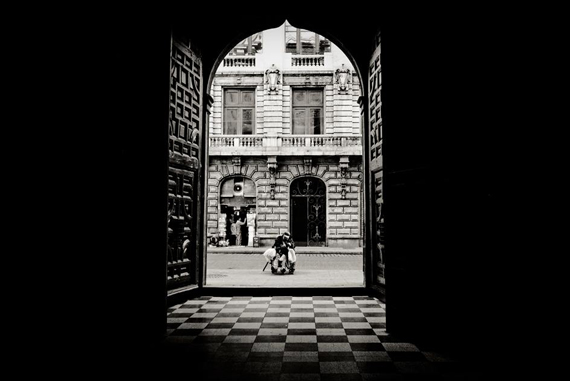
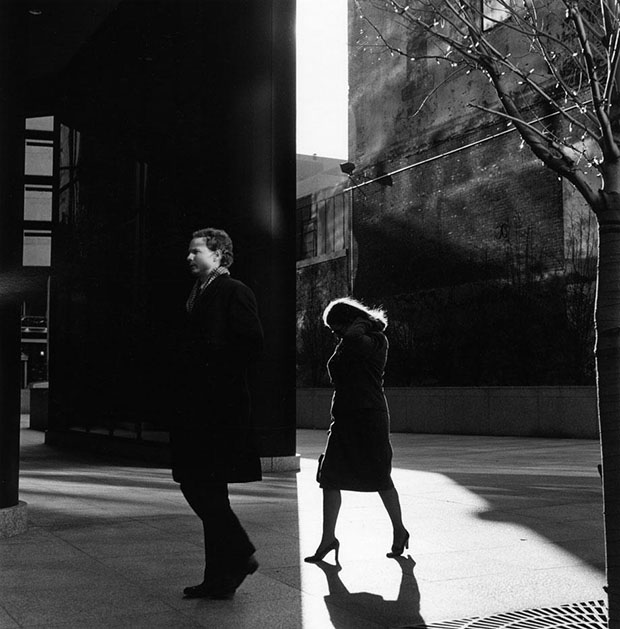


LINE


FRAMING ASSIGNMENT:
Partner-up! One camera per partnership
Your partner is your "subject". Take turns!
You are to pose them, and compose an image that reflects the different framing techniques above.
Each person is responsible to take photos!
Each person is responsible to pose!
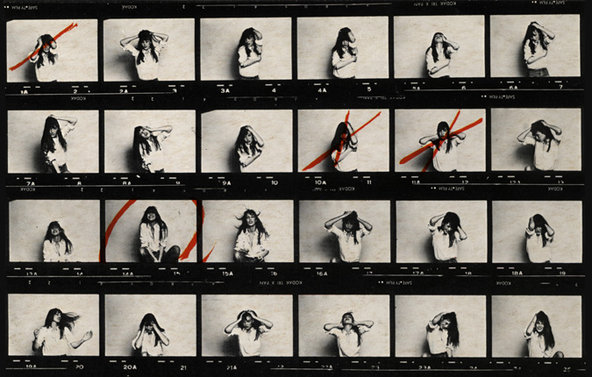
You will turn in a contact sheet with 4 of your best photos (only ONE can be without a person, the other 3 have to have a person in them.)
Contact sheet is due at the end of class. Save IN THE DRIVE with your name on it!
EXTRA TIME?
Edit your best photo.
Partner-up! One camera per partnership
Your partner is your "subject". Take turns!
You are to pose them, and compose an image that reflects the different framing techniques above.
Each person is responsible to take photos!
Each person is responsible to pose!
You will turn in a contact sheet with 4 of your best photos (only ONE can be without a person, the other 3 have to have a person in them.)
Contact sheet is due at the end of class. Save IN THE DRIVE with your name on it!
EXTRA TIME?
Edit your best photo.
Assignment #14
PHOTOSHOP TOOLS
Often times you'll find yourself in photoshop hitting a wall because you can't figure out how to make your cool ideas come to life. It's important we know photoshop tools, their location, and how to utilize them. Using the worksheet handed out, photoshop itself (it's a better cheat than your neighbor!), and this list below, label each photoshop tool. This information will be on the end of semester CTE exam! But more importantly, it will help you be a better editor.
Rectangular Marquee Tool
Use this tool to make selections on your image, in a rectangular shape. This changes the area of your image that is affected by other tools or actions to be within the defined shape. Holding the [Shift] key while dragging your selection, restricts the shape to a perfect square. Holding the [Alt] key while dragging sets the center of the rectangle to where your cursor started.
Eraser Tool
This is the anti-Brush tool. It works like an eraser (duh) and erases whatever information wherever you click and drag it. If you’re on a Layer, it will erase the information transparent. If you are on the background layer, it erases with whatever secondary color you have selected.
Gradient Tool
You can use this to make a gradiation of colors. Gradiation doesn’t appear to be a word, but it makes sense anyway. It creates a blending of your foreground color and background color when you click and drag it. Like a gradient.
Slice Tool
This is used mostly for building websites, or splitting up one image into smaller ones when saving out. It’s kind of an advanced tool, and since you’re in here for the basics, we’ll kind of skip over it. Kinda makes you mad I made you read all that for nothing, huh?
Move Tool
Use this tool to, well, move things. Usually you use it to move a Layer around after it has been placed. Hold the [Shift] key to limit the movements to vertical/horizontal.
Polygon Lasso Tool
Ok, this should be the Lasso Tool, but I use the Polygon Lasso a lot more often. Use this to draw selections in whatever shape you would like. To close the selection, either click on the beginning point (you’ll see the cursor change when you’re on it), or just double-click. When holding the [Ctrl] key, you’ll see the cursor change, and the next time you click, it will close your selection.
Healing Brush Tool
This is a really useful tool. Mildly advanced. You can use this tool to repair scratches and specs and stuff like that on images. It works like the Brush tool (see below). You choose your cursor size, then holding the [Alt] key, you select a nice/clean area of your image. Let go of the [Alt] key and paint over the bad area. It basically copies the info from the first area to the second, in the form of the Brush tool. Only, at the end, it averages the information, so it blends.
Brush Tool
This is one of the first tools ever. It’s what Photoshop is based off of. Well, not really, but it’s pretty basic. It paints one your image, in whatever color you have selected, and whatever size you have selected. There’s a lot of options for it, but this is basic, so you don’t get to learn them. Ha.
Clone Stamp Tool
This is very similar to the Healing Brush Tool (see above). You use it the exact same way, except this tool doesn’t blend at the end. It’s a direct copy of the information from the first selected area to the second. When you learn to use both of these tools together in perfect harmony, you will be a Photoshop MASTA! Not really, it’s just less irritating.
Magic Wand Tool
Use this to select a color range. It will select the block of color, or transparency, based on wherever you click. In the Options Bar at the top, you can change the Tolerance to make your selections more/less precise.
Crop Tool
The Crop Tool works similarly to the Rectangular Marquee tool (see above if you have no short-term memory). The difference is when you press the [Enter/Return] key, it crops your image to the size of the box. Any information that was on the outside of the box is now gone. Not permanently, you can still undo.
History Brush Tool
This tool works just like the Brush Tool (see above) except the information that it paints with is from the original state of your image. If you go Window>History, you can see the History Palette. The History Brush tool paints with the information from whatever History state is selected.
Path Selection Tool
You use this tool when working with paths. Since this is all about the basics, I won’t go into details. It’s related to the Pen Tool (see below) though.
Horizontal Type Tool
It makes type. Or text. Or whatever you want to call it. You can click a single point, and start typing right away. Or you can click and drag to make a bounding box of where your text/type goes. There’s a lot of options for the Type Tool. Just play around, it’s fairly straight-forward.
Blur Tool
The Blur tool is cool. It makes things blurry. Click and drag to make things blurry. The more you click and drag, the blurrier things get.
Dodge Tool
This tool isn’t as crappy as the car brand. It’s actually used to lighten whatever area you use it on. As long as it is not absolute black. Absolute black won’t lighten.
Pen Tool
I mentioned this tool above. It’s for creating paths, in which you would use the Path Selection Tool to select the path. Paths can be used in a few different ways, mostly to create clipping paths, or to create selections. You use the tool by clicking to add a point. If you click and drag, it will change the shape of your path, allowing you to bend and shape the path for accurate selections and such.
Hand Tool
You can really make short work of your job with the Hand Tool. It’s for moving your entire image within a window. So if you’re zoomed in and your image area is larger than the window, you can use the Hand Tool to navigate around your image. Just click and drag. You can get to this tool at any time when using any other tool by pressing and holding the [Spacebar].
Zoom Tool
Pretty obvious what this tool does. It allows you to zoom into your image. Don’t be dumb, it doesn’t actually change the size of your image. Hold the [Alt] key to zoom out. Holding the [Shift] key will zoom all of the windows you have open at the same time. Double-click on the Zoom Tool in the palette to go back to 100% view.
Rectangle Tool
By default it draws a Shape Layer in the form of a rectangle. It fills the rectangle with whatever foreground color you have selected. It’s pretty complicated, don’t hurt yourself with this one.
Notes Tool
Like post-it notes, but digital. You can use this tool to add small little note boxes to your image. These are useful if you’re very forgetful or if you’re sharing your Photoshop file with someone else. I’m pretty sure it only works with .PSD files.
Eyedropper Tool
This tool works by changing your foreground color to whatever color you click on. Holding the [Alt] key will change your background color.
BONUS!!
These are your color boxes. Foreground (in the front) and Background (in the back). Click on either one to bring up the color select dialog box.
Assignment #13
EDITING ALBUM ART
- Upload your images!
- Get your 6 photos checked off
- discuss with a partner which image(s) would be best for your album cover
- Drag the photos into photoshop for editing
- Adjustments
- Brightness/contrast
- Levels
- Curves
- Exposure
- Filters & color correction
- Cropping
- if you want you photo to fill your entire cover, crop it into a square
- Special Effects
- smart object
- clipping mask
- Adjustments
- Create new file in photoshop
- 4.724 x 4.724 inches
- 300 dpi
- white background
- Drag your edited image(s) in and arrange appropriately
- consider composition! Be deliberate about the choices you make.
- TYPOGRAPHY
- choose the MOST APPROPRIATE font for you CD
- you may have to search on google fonts (photoshop has a very limited selection)
- you MUST include typography on your CD cover
- band name
- song name (optional)
- choose the MOST APPROPRIATE font for you CD
- SAVE
- save as both a PSD and a JPG (two separate files).
- JPG: turn into the folder titled "Album Art"
- PSD: save in your drive and possible desktop so that you can go into the original file to make any necessary edits.
- save as both a PSD and a JPG (two separate files).
Assignment #12
KALEIDOSCOPE an exploration in clipping mask
VOCAB!
Smart Objects are layers that contain image data from raster or vector images, such as Photoshop or Illustrator files. Smart Objects preserve an image's source content with all its original characteristics, enabling you to perform nondestructive editing to the layer.
A clipping mask is a group of layers to which a maskis applied. The bottommost layer, or base layer, defines the visible boundaries of the entire group. For example, suppose you have a shape in the base layer, a photograph in the layer above it, and text in the topmost layer.
PRACTICE
Clipping mask & smart objects can be wonderful tools for editing photos in photoshop. The skills you learn in this practice will help make your Album Art assignment amazing!
We will explore:
How to download a font
how to convert text into a smart object
how to convert an image into a clipping mask
Step 1:
Search for a font online! (I suggest using google fonts)
Step 2:
- Create a new document in photoshop
- 10x10 inches (square)
- 300 dpi
- Using the text tool, type something!
- R click the layer with text on it and click "convert to SMART OBJECT"
- Drop in a new image
- R click the new layer and click "create clipping mask"
- Add a color background
PROJECT
- Create a new document in photoshop
- 10x10 inches (square)
- 300 dpi
- change "back ground contents" to "transparent"
- create "smart guides" in center of document
- go to view, rulers, drag down blue smart guides
- create a triangle shape using the PEN tool
- hit the triangle in all 3 corners as accurate as you can
- right click the triangle and click "fill path"
- turn layer into SMART OBJECT
- right click over LAYERS
- select "convert to smart object"
- Drag in a photo
- make sure the layers is in the correct order
- right click over photo layer and turn into CLIPPING MASK
- link the layers
- select both layers, right click, and "link layers"
- DUPLICATE linked layers
- create a duplicate of the layer by RIGHT clicking on the layers
- ROTATE
- In menu click "edit" "transform"
- choose the appropriate rotation
- first rotation: 180
- Second rotation: 90
- third rotation: flip vertically
- Repeat until your entire image is full
- Save your image as a JPEG with your name on it and load it in the drive.
Assignment #11
WORDS WORDS WORDS
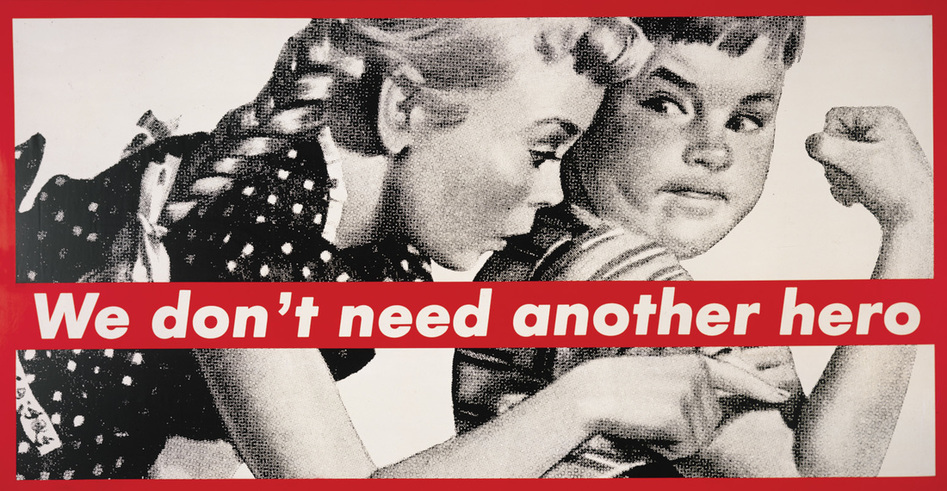
In class we will study the work of artist Barbara Kruger.
We will then conduct our own project in her image.
We will then conduct our own project in her image.
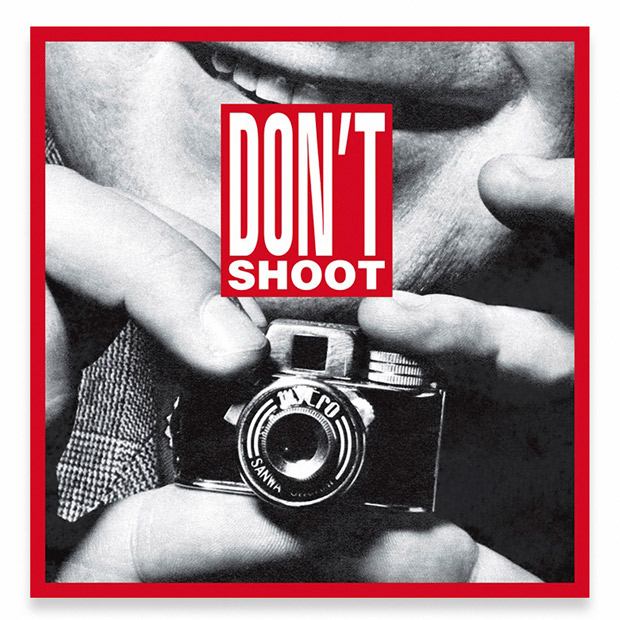


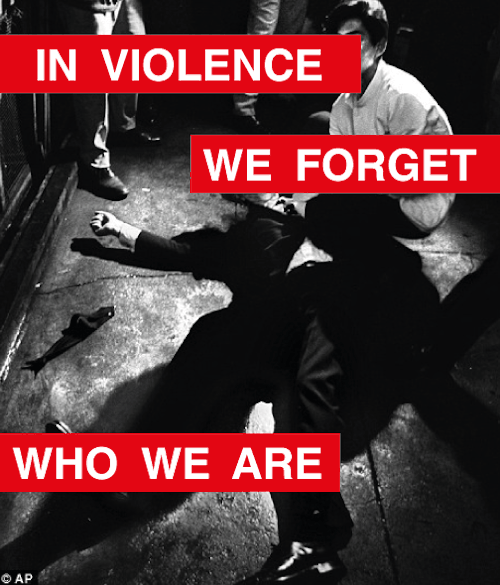
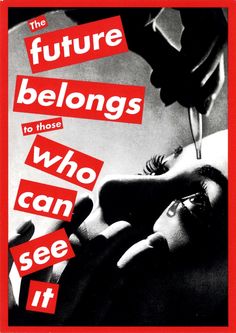
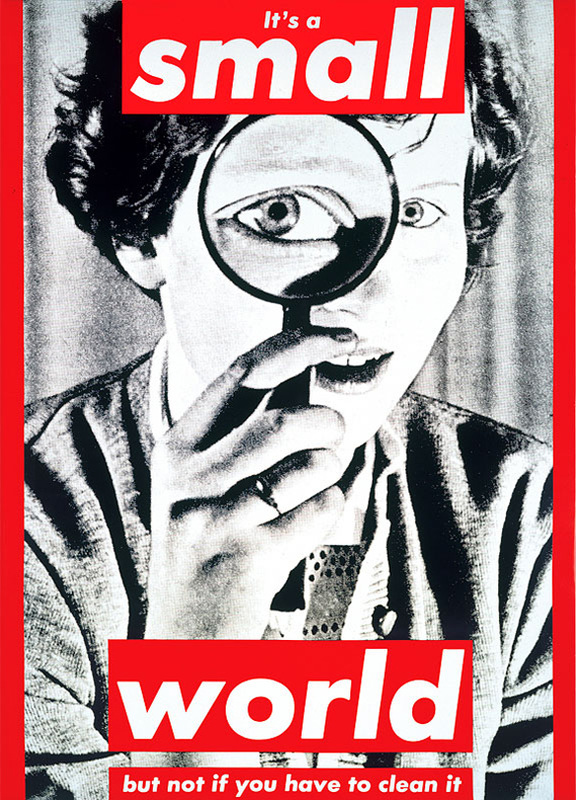
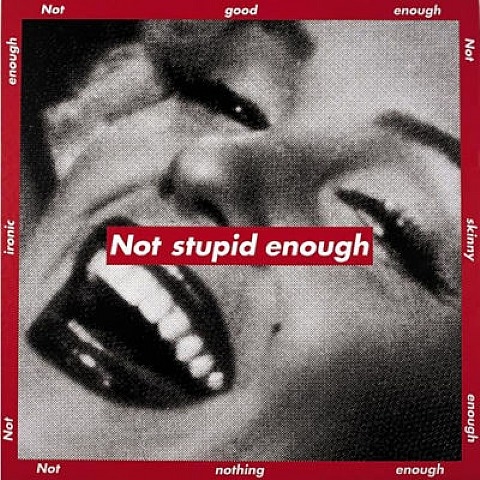
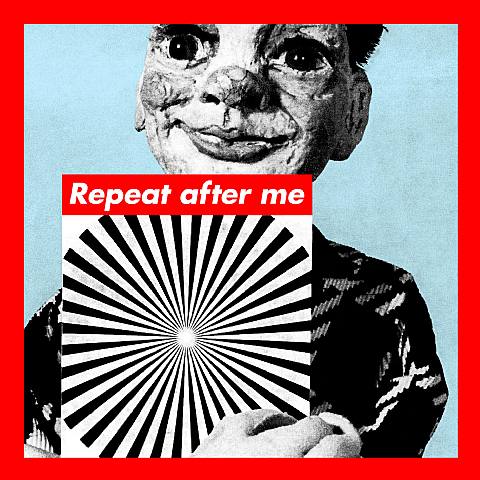


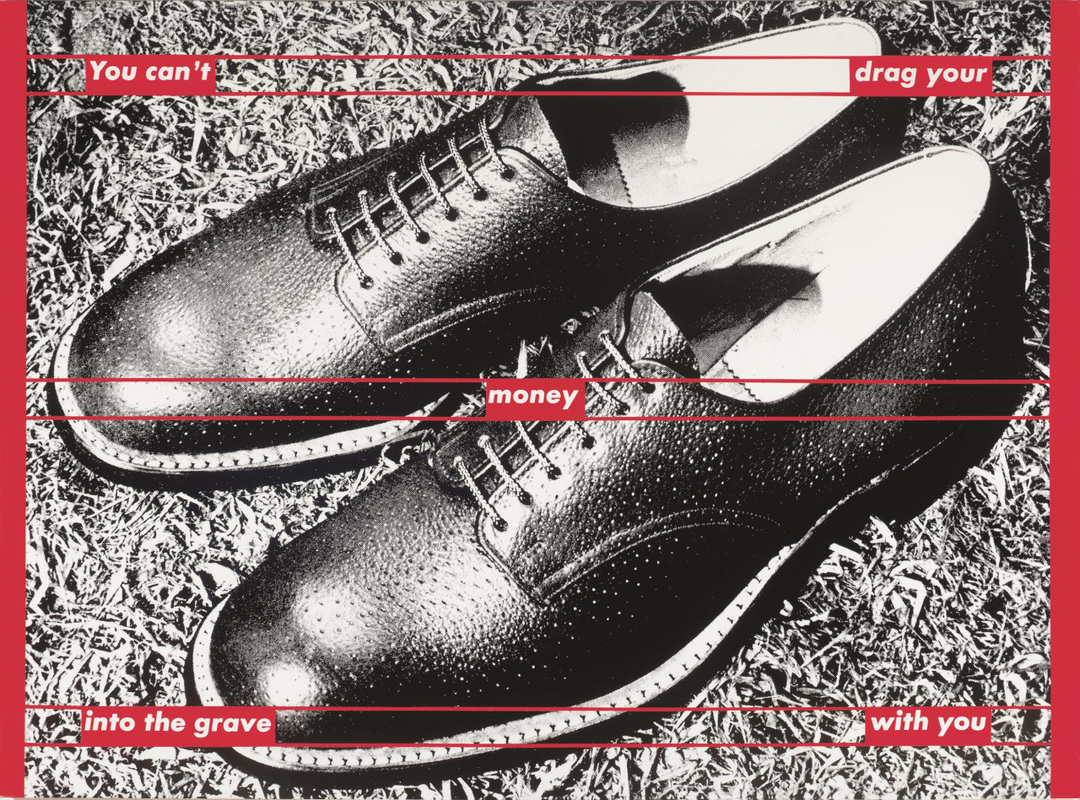
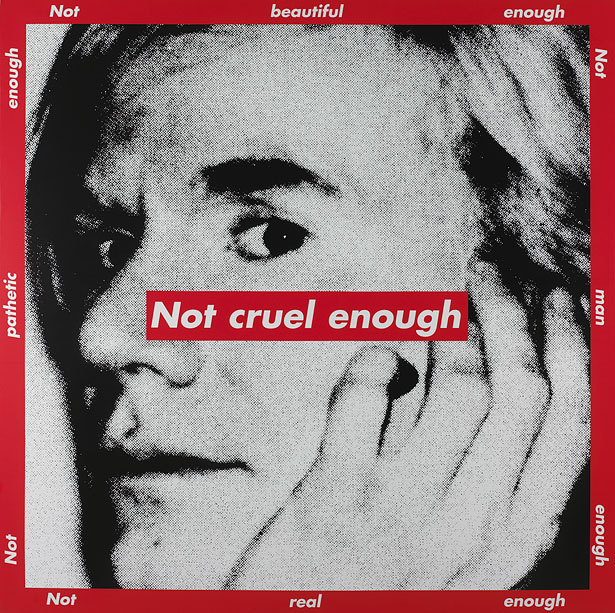


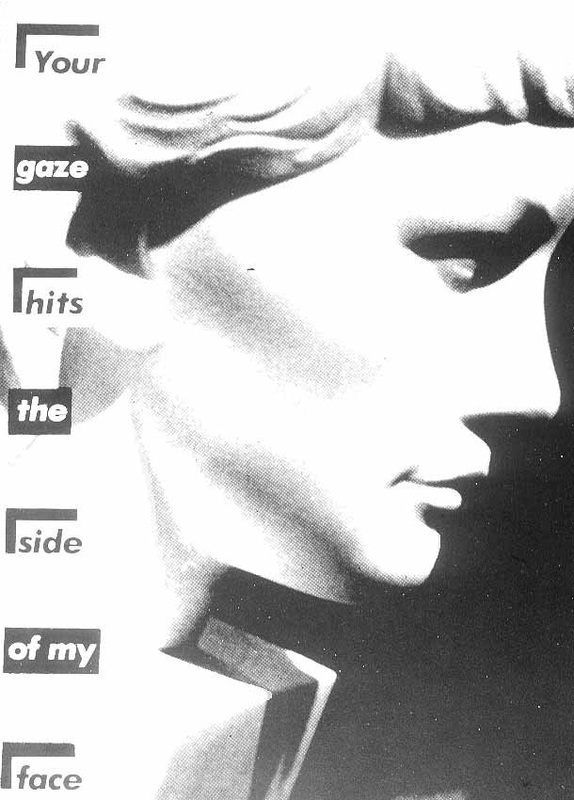
PRACTICE
- In class we will create a "Duck Face" or other image that emulates Barbara Krugers style.
- Find an image online and consider what text you could ad to it.
- phrases might include pronouns like "You" "Your" "I" "we" "They"
- Black and White image
- White Futura Font OR Helvetica Ultra Condensed
- Red borders, and red boxes behind the words
- Save in class folder under "Barbara Kruger Practice"
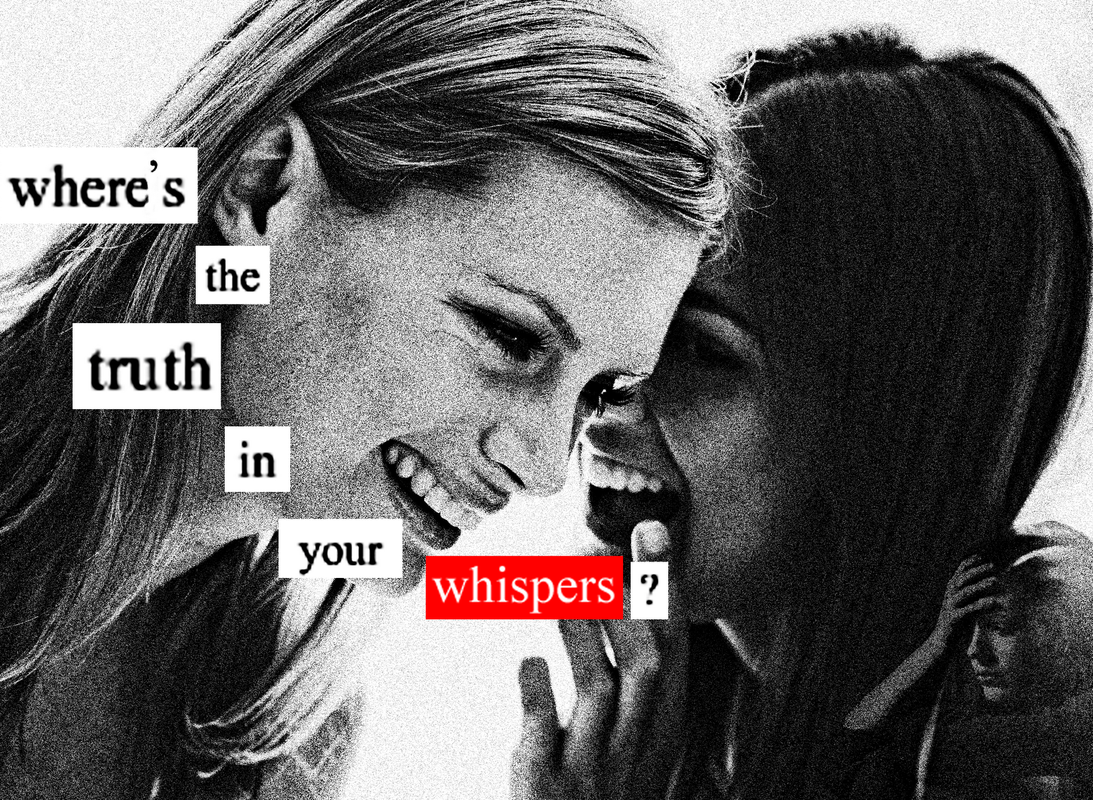
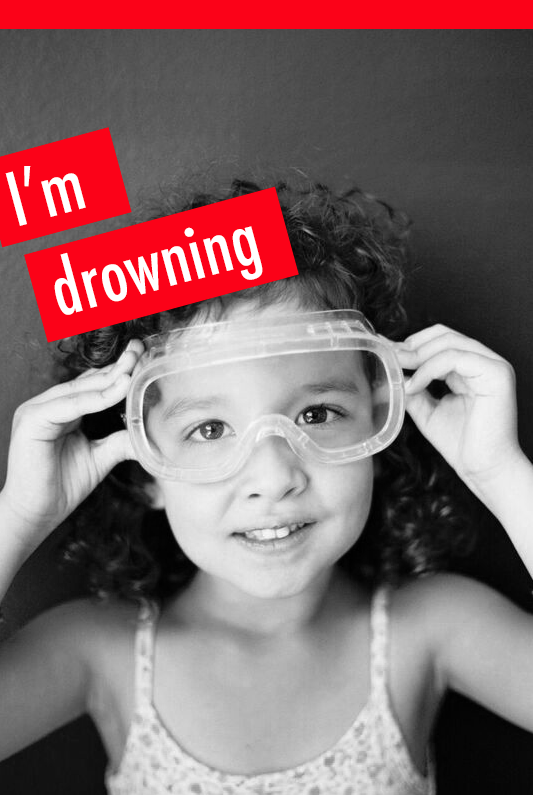
- You will create your own Barbara Kruger look alike image from start to finish.
- Think of something that you feel strongly about and take a photo to represent that thought. HW
- You can use a camera or your phone to take the image.
- Your completed image is due at the end of class October 27th.
- We will edit these in class. (you can do it, it's only one photo)
- Your image needs to be:
- an 5x7 or 7x5
- phrases might include pronouns like "You" "Your" "I" "we" "They"
- Convert image to Black and White
- use White Futura Font OR Helvetica Ultra Condensed
- Red borders, and red boxes behind the words
- Save in class folder under "Barbara Kruger PROJECT" as a jpeg file. Save a .psd file for your records.
Assignment #10
CLASS CRITIQUE
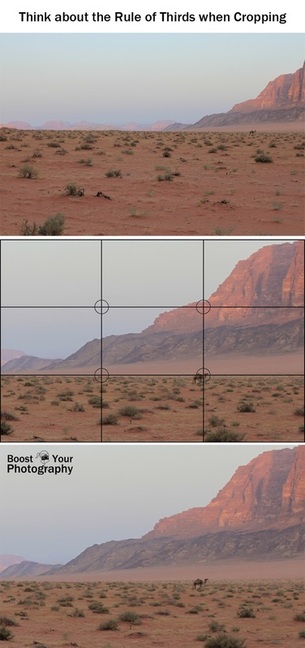
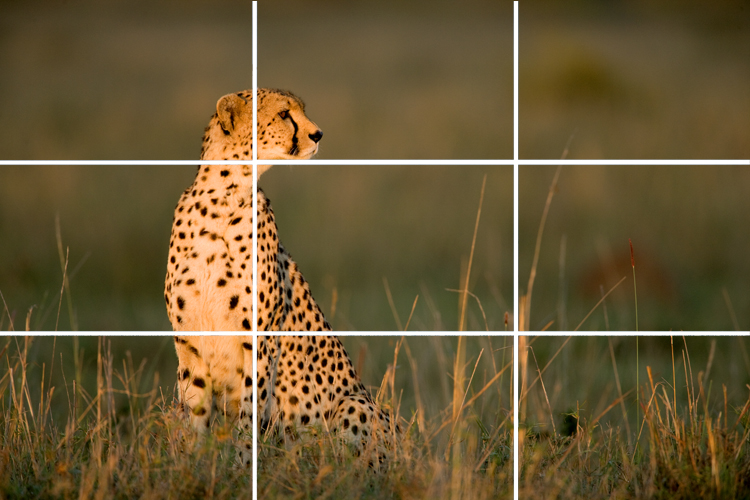
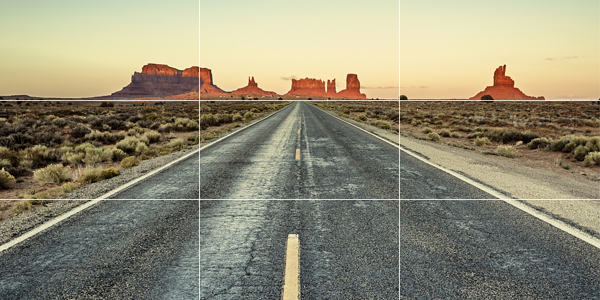
You've worked hard on your RULE OF THIRDS images! Let's take a look shall we?
In order to get the best out of this sharing process we will be doing a CLASS CRITIQUE.
The word Critique often gets a bad rap. Critique doesn't inherently mean negatively critical. A critique is simply the analysis of assessment of something. Successful art critiques can….
PART 1: class critique
For today's critique, we will be doing a silent "gallery stroll".
PART 2: Personal Critique
Fill out the form in class. Answer honestly on how you feel you did. What would you improve next time?
In order to get the best out of this sharing process we will be doing a CLASS CRITIQUE.
The word Critique often gets a bad rap. Critique doesn't inherently mean negatively critical. A critique is simply the analysis of assessment of something. Successful art critiques can….
- Help us identify useful elements of design
- guide us into deeper meaning
- allow us to see things from an audience view
- open the door for personal interpretation
- give us ideas to strengthen our art practices
- celebrate a job well done!
PART 1: class critique
For today's critique, we will be doing a silent "gallery stroll".
- Using the worksheet handed out, choose 4 DIFFERENT ARTIST'S work.
- Write 3-5 sentences for each artist
- How was the RULE OF THIRDS used?
- What is your favorite part of the piece?
- What title would you give it?
- What would you have done differently?
- Once complete, cut each "critique" out and place it at the proper computer.
PART 2: Personal Critique
Fill out the form in class. Answer honestly on how you feel you did. What would you improve next time?
Assignment #9
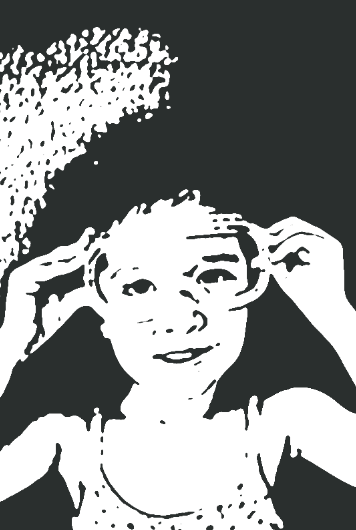
WHAT'S THE CODE
A3 Photo only (SUB)
This assignment was done in my advertising class as well! They really enjoyed it so I thought you'd like it too. PLEASE HELP YOUR NEIGHBORS! I've written very detailed instructions. But I know that many of us (myself included) learn best from example. Please help your classmates!
Instructions:
This assignment was done in my advertising class as well! They really enjoyed it so I thought you'd like it too. PLEASE HELP YOUR NEIGHBORS! I've written very detailed instructions. But I know that many of us (myself included) learn best from example. Please help your classmates!
Instructions:
- Find a photo online that interests you. It could be about something you like (sports, food, etc.). Drag photo on your desktop. OR use a photo that you took yourself! Make sure it is a .jpg file.
- Right Click your photo and hit "rename". Delete the ".jpg" and replace it with ".txt"
- right click your .txt file and click "open with" choose default "TextEdit"
- minimize the "TextEdit" window.
- right click your .txt file and save it back into a .jpg file. double click the file so it pulls up in preview. Expand your "TextEdit" file.
- you'll now have open your image in preview & a file in text edit with only text.
- Think of TEXT that has to do with that image. For example, if you pulled a photo from this last weeks BYU game, the final score or a script of the plays would be related. If you chose a photo of macaroni and cheese, you could look up a mac&cheese recipe. You just need TEXT/WORDS about your image.
- copy that text and paste it into you "text edit" file.
- avoid the top quarter of text. It is too sensitive and if manipulated will often corrupt your entire file.
- You should be able to watch your jpg file be manipulated! If it's not showing up, just click the image to activate it.
- Play around with adding, deleting, and changing the code. (sometimes a simple lowercase to uppercase change can make a huge difference in your image!) Once you are happy with the result, close the "TextEdit" box.
- Upload your glitched file to the drive: classes>A3 digi photo>GLITCH IT images
- make sure your name is included in the file so I know who to give credit to!
STUDENT EXAMPLES by Robin Wise, Belen Brosio, & Teo Taylor *click to enlarge!

Assignment #8
PHOTO-SHOOT #1 RULE OF THIRDS
TURN IN PROCEDURES:
-Get your 10 photos checked off
-Make a contact sheet with your top 9 best photos & turn into DRIVE class folder "ROT contact sheet"
-Edit your TOP THREE best photos in photoshop
*Remember to SAVE FILES as .psd if you are still wanting to edit them. Once you are ready to turn them in, save them as .jpg files.
This is your first out-of-class photoshoot assignment! Using whatever camera you can, take 10 DIFFERENT photos using the RULE OF THIRDS.
TURN IN PROCEDURES:
-Get your 10 photos checked off
-Make a contact sheet with your top 9 best photos & turn into DRIVE class folder "ROT contact sheet"
-Edit your TOP THREE best photos in photoshop
- adjustments
- exposure
- cropping
- straightening
- filters
*Remember to SAVE FILES as .psd if you are still wanting to edit them. Once you are ready to turn them in, save them as .jpg files.
This is your first out-of-class photoshoot assignment! Using whatever camera you can, take 10 DIFFERENT photos using the RULE OF THIRDS.
- The subject matter may be whatever you'd like but the Rule of thirds must be applied!
- Photos not adhering to the rule of thirds will lose points.
- Each photo should be different! They could potentially be of the same subject matter but must be a different angle or view point so that each photo is unique.
- We will be editing these photos IN CLASS. Don't edit them prior (this includes phone editing tools).
- THESE PHOTOS ARE DUE OCTOBER 4TH (A day) & OCTOBER 5TH (B day).
- You must have the files in class at that time. If using a phone, please bring a phone cord to connect your phone to the computer. I should have card readers for anything else that doesn't use a standard SD card.
EXAMPLES

Assignment #7.2
PHOTOSHOP PLAY : FILTERS
1. Open up Photoshop
2. Add "Artistic Filters" to your filter menu
2. Add "Artistic Filters" to your filter menu
- Click "Photoshop" in the pull-down menu
- Hover over "Preferences"
- Click "Plug ins"
- check the box "Show all filter gallery groups and names"
- Find the "Filters" tab on the pull-down menu.
- Try out a few filters! Some of my favorites include:
- Blur (I LOVE "tilt-shift" great for adding emphasis in an image!)
- Texture (you can add "grain" for a film photo look!)
- "Sharpen" can help your image look crisp. *try "sharpen more"
- Sketch> stamp
- use "Pixelate" > Color half tone for a comic book look
- Use "Distort" to warp your image
- "Artistic" > "Cutout" simplifies your colors & shapes
- "Render" > "lens Flare" *makes most sense when used in photos taken outside on sunny days!

Original

Cut-out

Tilt-shift
|

Sharpen More

Lens Flare

Color half-tone
|

Grain

Distort
Stamp
|
4. Edit the same photo, 4 different ways using one or a combination of several filters OR 4 different photos 4 different ways.
5. Save each image file > save as > title ("photo filters 1.jpg" etc) > on your desktop > save as a .jpg file!
6. Post 6 photos on your website under blog post titled "filters". Label each image with the filter you used.
Assignment #7.1
PHOTOSHOP PLAY: ADJUSTMENTS
1. Drag any photo you've taken into photoshop.
2. Convert your image to black and white!
- image>adjustments>black and white
3. Under Image > Adjustments > alter your photo using
- Brightness/contrast
- Levels
- Curves
- Exposure
|
3. create a custom color gradient layer on your image!
4. Upload to website!
|
|

|

Assignment #6
CREATE A CONTACT SHEET
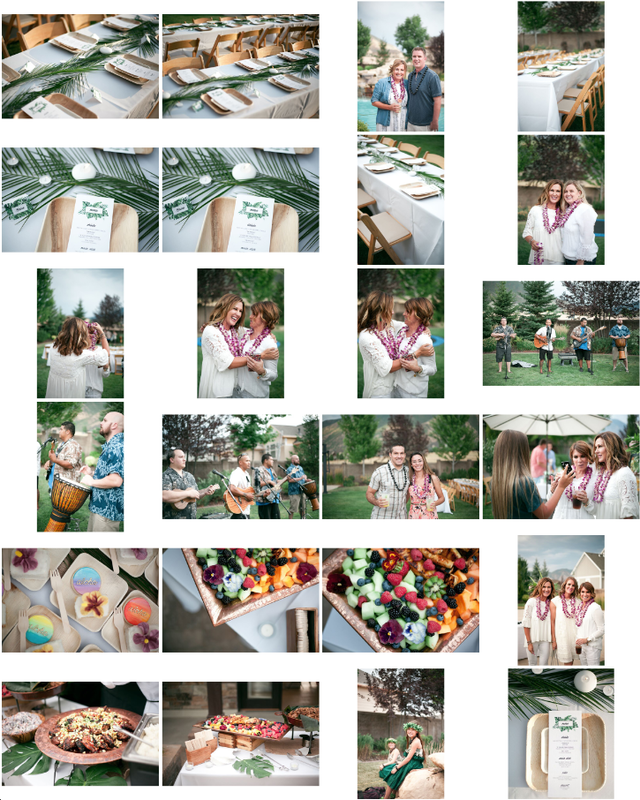
HISTORY: a contact sheet is a positive print of all the negative images from one film roll, made by a contact printing process so that all the images are the same size as the negative. A contact sheet is a useful way of seeing which are the best images on a film so you can decide which ones to make enlargements from.
Even though we work digitally, the practice of making a contact sheet is useful so that we can see all images from a shoot, collected in one space. I will have you turn in contact sheets for most assignments moving forward, so let's practice!

- Go to finder and under "applications" search for Adobe Bridge
- once open, select your photos from your desktop and drag into bridge
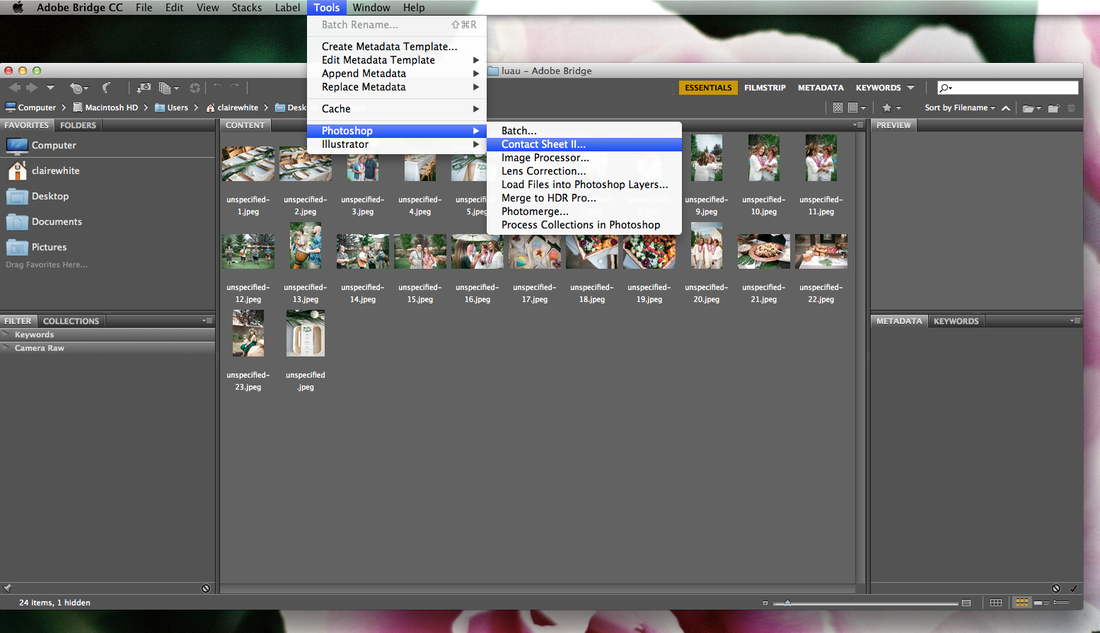
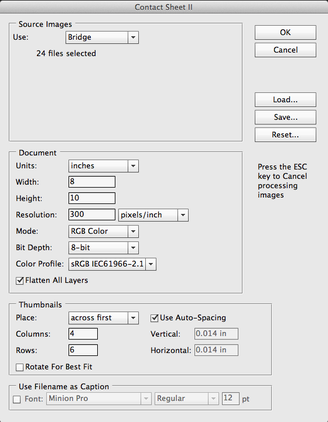
- Click on "tools" at the top of the bar (image 1)
- Hover over "Photoshop"
- Click "Contact Sheet"
|
|
For your first contact sheet, I'd like you to upload the photos you took for your "one word" Elements of Photography Challenge. Some of you might have only taken a few photos. Others might have taken dozens. Upload a minimum of 6 and a maximum of 20.
Once you've created the contact sheet, upload to your website under "blog"/"assignments". Title it with your "one word".
Once you've created the contact sheet, upload to your website under "blog"/"assignments". Title it with your "one word".
Assignment #5
ELEMENTS OF PHOTOGRAPHY
What makes a good photo? Let's explore the elements of photography! (powerpoint).
You will be assigned one word from the elements of photography. Your challenge is to take a photo representing that word.
Camera Check-in Review:
1. DELETE PHOTOS (make sure you've uploaded them onto the computer first!)
2. CHECK BATTERY *if needs charging, see Mrs. White
3. TURN IT OFF don't drain the battery!
4. CHECK FOR: cord/charger/lens cap/extra lens ZIP IT UP!
You will be assigned one word from the elements of photography. Your challenge is to take a photo representing that word.
- Take several! Try different angles and perspectives of the same subject! Experiment!
- Once you've taken your photos, upload them onto your computer to work with later.
Camera Check-in Review:
1. DELETE PHOTOS (make sure you've uploaded them onto the computer first!)
2. CHECK BATTERY *if needs charging, see Mrs. White
3. TURN IT OFF don't drain the battery!
4. CHECK FOR: cord/charger/lens cap/extra lens ZIP IT UP!
Assignment #4
MEET MODE DIAL
In order to take full advantage of the abilities of your camera, you must become familiar with your camera's mode dial. Each mode has a specific purpose and depending on what situation you are in, one mode may be better than the other. Some modes make the camera do all the thinking, others give the photographer more freedom to make deliberate choices.
Instructions:
Instructions:
- Draw a picture of the camera mode dial labeling each different mode. *see tips & tricks here for help!
- Write in your own words the definition of Automatic Modes vs. Manual Modes
- Take an image sample using each automatic modes:
- portrait
- landscape
- close up/macro
- Action
- portrait
Assignment #3
PEOPLE, PLACES, & THINGS
All photos fall under the following categories: people, places, and things. For this assignment you'll be using your cell phones! Take 5 photos of people, 5 photos of places, and 5 photos of things. Consider this your photo "pre-test". We'll be re-doing this assignment later on this semester to see how we've grown as photographers!
Of your 15 photos, choose one from each category and upload them onto your website under "blog" or "assignments".
Title: People, places, & things
Of your 15 photos, choose one from each category and upload them onto your website under "blog" or "assignments".
Title: People, places, & things


Assignment #2
ONLINE PORTFOLIO
We've explored a myriad of different careers in the photography industry and one thing they all had in common is the need for a portfolio! There are many different avenues that professional photographers take when creating a portfolio. Instagram accounts, Facebook pages, and websites. We'll be making a website to document your work throughout this semester.
Instructions:
Instructions:
- create a site on weebly.com (use the free weebly domain!)
- Include the following pages
- Home
- About
- Portfolio
- Blog/Assignments *make sure you choose a "blog" page for this!
- Include a link or button on your site that leads to my website: timpanogosphotography.weebly.com
- email me your website URL at [email protected] with subject line: (class period) (name) include the URL link in email.
Assignment #1
SHOOT FOR A CAREER IN PHOTOGRAPHY
Want to be a photographer? Let's explore the many career options you have!
Instructions:
Instructions:
- Choose one of the following photo careers to explore! If you can think of one not listed, let me know so I can add it.
Fashion Photography
Product Photography
Race/event Photography
Wedding Photography
Film Photography
Studio Photography
School Photographer
Stock Photography
Wildlife Photography
Interior Photography
Fine Art Photography
Real Estate Photography
Sports Photography
Photojournalism
Documentary
Fine Art Photography
Portrait Photography
Birth Photography
- Search the internet to find out more about this career. Answer the following questions below. Use your sleuthing internet skills! Some places to start: Salary.com, Wikipedia, Forbes, etc.
Job Description:
Necessary schooling/special training:
Average Salary:
What are the hours like?
What are some positives aspects of this job?
What are some negative aspects of this job?
Would you personally be interested in working in this field? Why/why not?
